JWT Authentication in Node.js Explained Simply
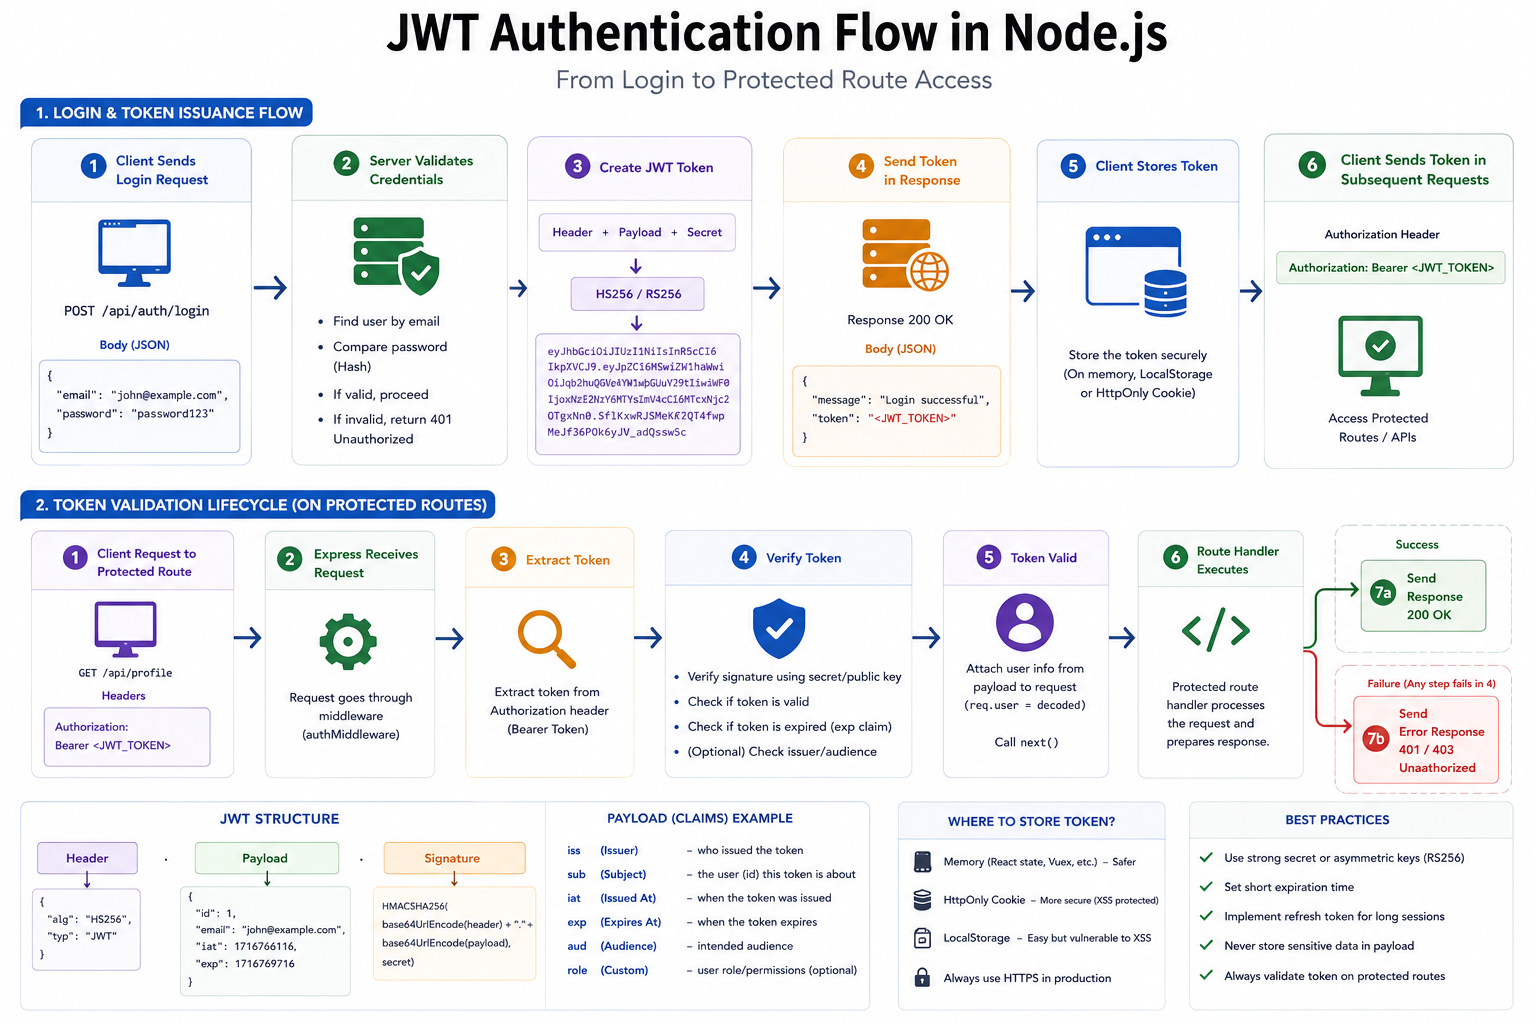
Imagine walking up to a highly exclusive club. The bouncer stops you. You hand over your ID, they check it against a guest list, and let you in. But what happens when you go to the bar to order a drink? The bartender doesn't know who you are. Do you have to go back outside and show the bouncer your ID again?
In the world of web applications, HTTP is "stateless" meaning it has no memory. Every single time a user requests a new page, clicks a button, or tries to access data, the server treats them like a complete stranger.
Authentication is the process of proving who you are. But to avoid making users "log in" on every single click, we need a way to keep them authenticated. This is where JSON Web Tokens (JWT) come in. They act as a digital VIP wristband. Once you prove who you are, you get a wristband. Every time you want a drink (or data), you just flash the wristband.
Let's break down exactly how this stateless authentication works in a Node.js and Express environment.
1. The Power of Stateless Authentication
Historically, servers used Sessions. When you logged in, the server created a record in its own database (or memory) saying "User A is logged in," and gave your browser a tiny cookie with a Session ID. Every time you made a request, the server had to look up that ID in its database. This is stateful authentication. It works, but if you have a million users, looking up session IDs constantly becomes incredibly resource-heavy.
JWT is stateless. The server doesn't remember you at all. Instead, it packs all the necessary information about you into the token itself, cryptographically signs it, and hands it to you. When you send the token back, the server just checks the signature. No database lookups required.
2. Anatomy of a JWT
If you look at a raw JWT, it looks like a long, random string of gibberish separated by two periods: xxxxx.yyyyy.zzzzz
But it's not random. It's actually three distinct Base64-encoded strings merged together:
Part 1: The Header (xxxxx)
The header is a simple JSON object that acts as the metadata. It usually contains two parts: the type of token (JWT) and the signing algorithm being used (like HMAC SHA256).
Part 2: The Payload (yyyyy)
This is the meat of the token. It contains the "claims" statements about an entity (typically the user) and additional data.
What goes in: The user's ID, their role (
adminvsuser), and an expiration timestamp (exp).What NEVER goes in: Passwords or highly sensitive personal data. Anyone can decode a JWT payload. It is digitally signed to prevent tampering, but it is not encrypted.
Part 3: The Signature (zzzzz)
This is the security seal. The server takes the encoded Header, the encoded Payload, and a Secret Key (a password that only the server knows) and hashes them all together. If a hacker intercepts the token and tries to change their role in the Payload from user to admin, the Signature will instantly become invalid because the payload data no longer matches the cryptographic hash.
3. The Login Flow (Getting the Wristband)
How do we actually generate this token in an Express app? The flow is straightforward:
The Request: The user submits a POST request to
/api/loginwith their email and password.The Verification: Your Express route queries the database to find the user and checks if the password matches.
The Generation: If the password is correct, you use a library like
jsonwebtokento create a token. You embed their User ID in the payload, sign it with your server's Secret Key, and set it to expire in (for example) 1 hour.The Response: The server sends a JSON response back to the client containing the generated token.
4. Sending the Token with Requests
Now the client (like a React frontend or a mobile app) has the token. It usually stores this token in localStorage or an HttpOnly cookie.
When the client wants to access a protected route—like viewing their private dashboard—they must send the token along with the HTTP request. The industry standard is to place it in the Authorization header using the "Bearer" schema.
It looks like this in the raw HTTP request:
GET /api/dashboard HTTP/1.1
Host: yoursite.com
Authorization: Bearer eyJhbGci...<rest of the token>
5. Protecting Routes (Validating the Wristband)
When that request hits your Express server, you don't want to manually check the token in every single route. Instead, you create a piece of Middleware.
Middleware is a function that intercepts the incoming request before it reaches your actual route logic.
The Intercept: The middleware looks at the
Authorizationheader. If there is no token, it immediately kicks the user out with a401 Unauthorizederror.The Verification: If a token exists, the middleware uses the
jsonwebtokenlibrary and your server's Secret Key to verify the signature.The Expiration Check: It checks the payload to ensure the token hasn't expired.
The Handoff: If the token is valid and untampered, the middleware attaches the decoded user data (like the User ID) to the
reqobject and callsnext(), allowing the request to proceed to the protected dashboard route.
By utilizing JWTs, your Node.js backend remains incredibly lightweight. It doesn't have to remember who is logged in; it simply trusts the math behind the cryptographic signature. It’s an elegant, scalable solution for keeping your applications secure without slowing them down.


