Setting Up Your First Node.js Application Step-by-Step
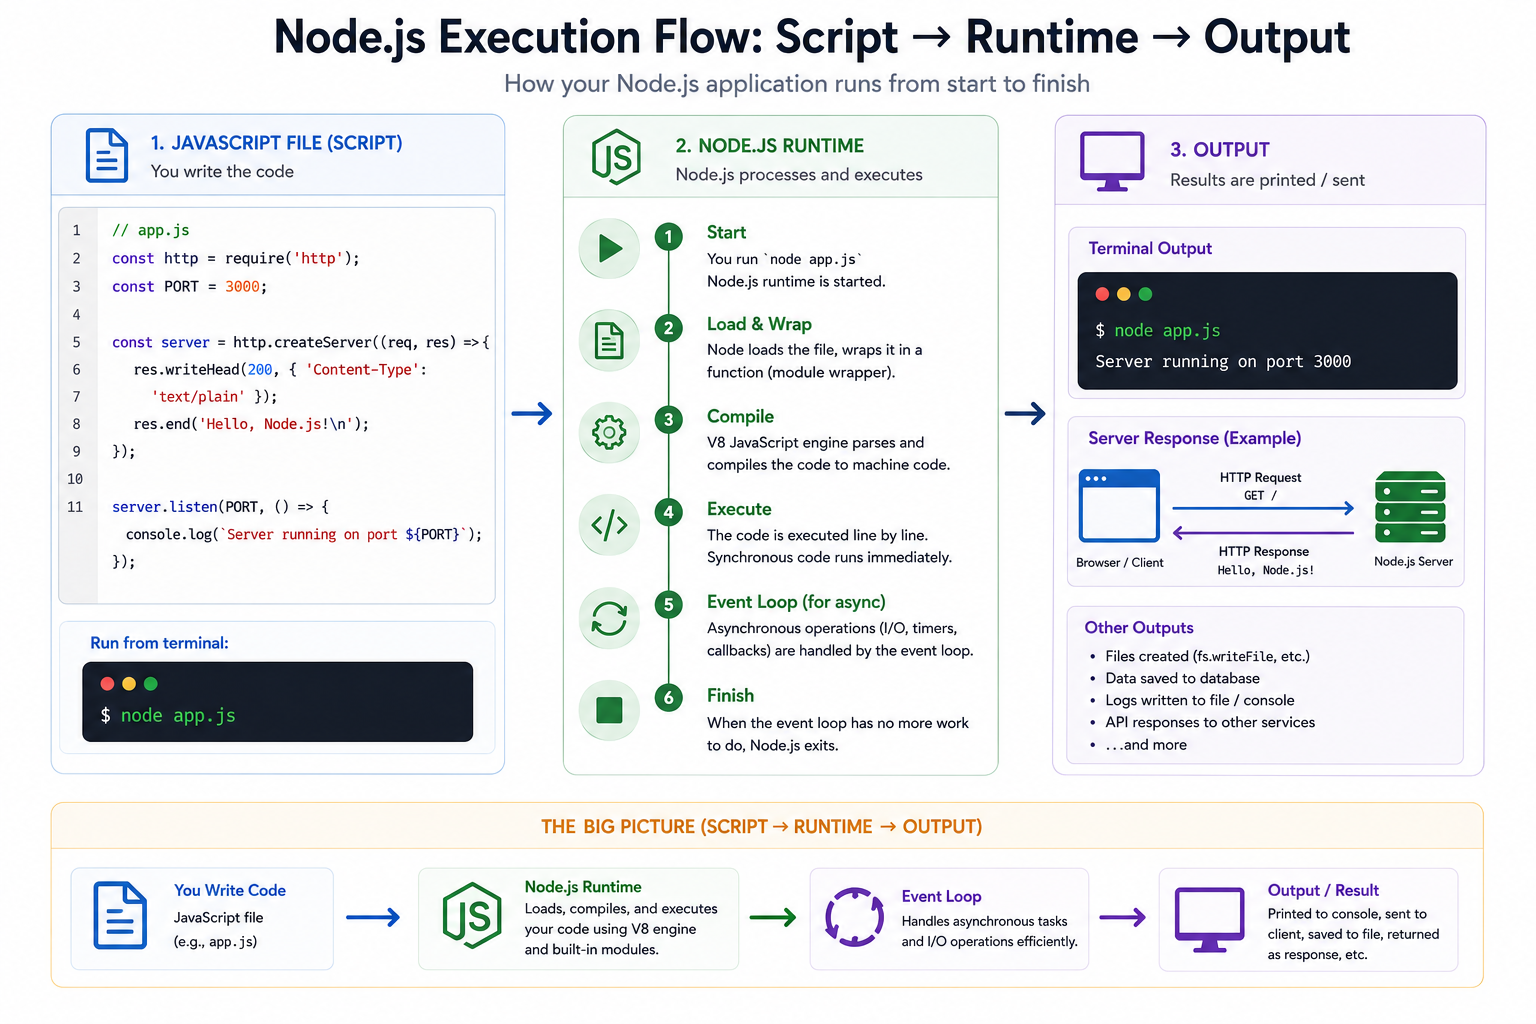
Every great backend developer has to start somewhere. Before you can build highly scalable microservices or real-time web socket applications, you need to understand the raw mechanics of the environment you're working in.
We often rush into installing frameworks to do the heavy lifting for us, but there is immense value in stripping away the magic and seeing how Node.js operates bare-bones. Today, we aren't using Express, Nest, or Koa. We are going to install Node, understand how it executes code, and build a functioning web server using absolutely nothing but the tools built into the runtime itself.
Let’s get your machine ready.
Step 1: Installing Node.js (The Right Way)
Regardless of whether you are on Windows, macOS, or Linux, the installation process starts in the same place.
Head over to the official website: nodejs.org.
You will see two large download buttons: LTS (Long Term Support) and Current.
Always choose LTS. The "Current" version has the latest bleeding-edge features, but it can be unstable. The LTS version is battle-tested, secure, and what you should be using in a professional production environment.
Download the installer for your operating system and click through the default setup prompts. You don't need to check any special boxes—the default configuration is exactly what we need.
Step 2: The Sanity Check
Once the installation finishes, we need to verify that your computer actually recognizes Node.js.
Open up your Terminal (macOS/Linux) or Command Prompt / PowerShell (Windows) and type the following command:
node -v
If the installation was successful, the terminal will print out the version number you just installed (for example, v20.11.0).
While you're at it, check that NPM (Node Package Manager) was installed alongside it:
npm -v
If both commands return version numbers, congratulations—your machine is officially ready for backend development!
Step 3: Playing in the Sandbox (The Node REPL)
Before we create any files, let's talk directly to Node. In your terminal, simply type:
node
You'll notice your terminal prompt changes (usually to a >). You have just entered the REPL.
REPL stands for Read, Eval, Print, Loop.
Read: It reads the JavaScript code you type.
Eval: It evaluates (executes) that code using the V8 engine.
Print: It prints the result back to your screen.
Loop: It waits for you to do it again.
Think of the REPL as the browser's developer console, but living inside your terminal. Try typing 5 + 5 and hit Enter. Try typing console.log("Hello Node!"). It executes instantly.
The REPL is fantastic for quickly testing snippets of logic without having to set up a whole project. To exit the REPL, type .exit or press Ctrl + C twice.
Step 4: Writing Your First Script
The REPL is great for testing, but real applications live in files. Let's write an actual script.
Create a new folder on your computer named
my-first-node-app.Open that folder in your favorite code editor (like VS Code).
Create a new file named
app.js.
Inside app.js, add a simple line of code:
console.log("Houston, we have liftoff! Node is running my file.");
To run this file, we use the node command followed by the name of the file. Open your terminal, ensure you are inside the my-first-node-app directory, and run:
node app.js
You should see your message printed directly in the terminal!
Step 5: Building a "Hello World" Server
Running a script is cool, but Node is famous for building web servers. Let's build one from scratch. We are going to use the http module, which is baked directly into Node.js—no downloads required.
Replace the code in your app.js file with this:
// 1. Import the built-in HTTP module
const http = require('http');

// 2. Create the server
const server = http.createServer((request, response) => {
    // This callback runs every time a user visits our site

    // Set the HTTP status code to 200 (OK) and the content type to plain text
    response.writeHead(200, { 'Content-Type': 'text/plain' });

    // Send the actual message and end the response
    response.end('Hello World! This is my raw Node.js server.');
});

// 3. Tell the server to listen on port 3000
const PORT = 3000;
server.listen(PORT, () => {
    console.log(`Server is up and running on http://localhost:${PORT}`);
});
What is happening here?
Every time you visit a website, your browser sends a Request, and the server sends back a Response. When we call http.createServer(), we pass it a callback function. Node.js will trigger this function every single time someone accesses our server, handing us the request data (what the user is asking for) and giving us a response object to send data back.
Let's run it!
Go back to your terminal and run the file again:
node app.js
This time, the terminal won't immediately return to the prompt. It will "hang," displaying your Server is up and running... message. This is exactly what we want! Your Node application is currently listening, waiting for traffic.
Open your web browser and navigate to http://localhost:3000.
You should see your plain text "Hello World" message printed on the screen. You just built a functional, local web server using nothing but pure JavaScript and the raw power of the Node.js runtime environment.


